Tuesday, November 29, 2011

Industrial ~ Vintage Style


While I'm doing my best to get back in the swing of things...
after enjoying Thanksgiving week with family and friends...
I thought I might share a few of my favorite industrial ~ vintage things.
 

 I enhanced the top of the ironing board with the French word for laundry (laverie) a couple of years ago.


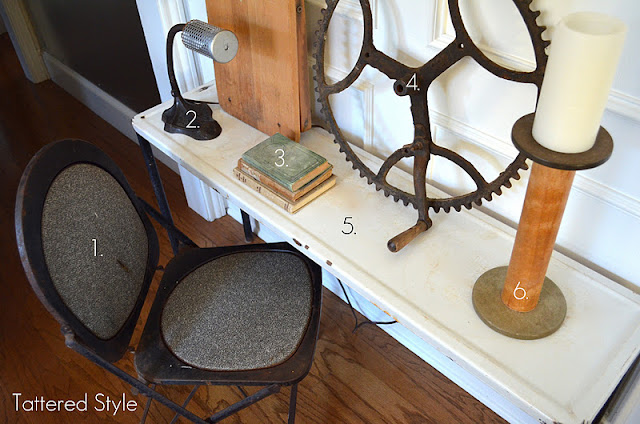
I love the metal, holey, thingamajig ~ I don't know what it is ~ do you?  I plopped it over the light bulb on this vintage lamp whose shade had gone missing.  When the light is turned on ~ it lets out hundreds of little circles of light.


An interesting cog with a wooden handle ~ industrial finery in my opinion. 


  1. Quirky metal folding chair with grey, speckled, vinyl padding ~ pretty cool!
  2. Desk Lamp w/makeshift lampshade ~ thanks Gavin ~ for permanently attaching it.
  3. Vintage books ~ Nat's and some from Maddie's wedding. 
  4. Cog coolness + love the wood handle!
  5. Wonderful old white enamelware table ~ I think a fish tank used to sit on it.  Read a great story about Reagan's fish tank experience here and here.
  6. A large wood spool ~ turned candle holder. 
All but the books were found here.  Have you been there yet?  If not, you should plan a trip!  I'm in the middle of planning and pulling out Christmassy things ~ I'll be sharing soon.  :) 

Friday, November 25, 2011

Thankful Today

 
I'm thankful today for many things ~ but most importantly ~ my faith, family and friends.  I'm also thankful for you and the opportunity you allow me in sharing my love for Tattered Style ~ the art of living with the not so perfect.  So while I'm off enjoying some time with the family, I wanted to share a simple post of "thanks" with you. 


I'm pretty smitten with these wonderful old wooden printer's block letters ~ I often spell out sentiments and place them around my home on vintage ironstone plates or platters (I found the letters here ~ Wanda, in Antique Alley has the best selection). 


For Thanksgiving, I used this wonderful blue and white vintage grain sack (folded over) as a runner atop the buffet in my dining room.  I found this one here


The old buffet was a garage sale find and is still patiently awaiting a paint transformation.  The pretty fall colored flowers were a treat my hubby brought home the other day.  I can't think of anything more charming to put them in than this old Kerr canning jar. 

Thank you for stopping by today ~ I hope you are having a nice little reprieve from the norm and are enjoying time with those you love.  XO

Tuesday, November 22, 2011

Cardboard Table ~ Why Not?


Awhile back, I was at a shop waiting for some guys to load a purchase into the back of my truck.  I noticed an empty cardboard tube sitting off to one side.  Curiosity got the best of me, so I asked them what was going to happen to it.  As expected, they were going to throw it out.  So without hesitation, I asked them if I could have it.  "Sure," they said as they let out a little chuckle and loaded it into the back of my truck.

I know for most, this humble piece of cardboard would be headed straight for the recycle bin.  But I just couldn't let it go.  It was strong and durable and I had visions of a side table in my head.  I'm not sure what Penny saw but she seemed quite curious...


She kept hanging around so I had to snap these cute pictures of her. 


I can only imagine what was going through her mind.  Probably something like ~ "Ya know you could be playing fetch with me" ~ and I did ~ some.
 
After awhile she grew bored, but faithfully continued to hang around as I got back to my project. 


On my last post, I experimented with some stencils ~ specifically for use on this table.  I don't want to overdo the use of letters/numbers ~ but I do have a fascination with them.

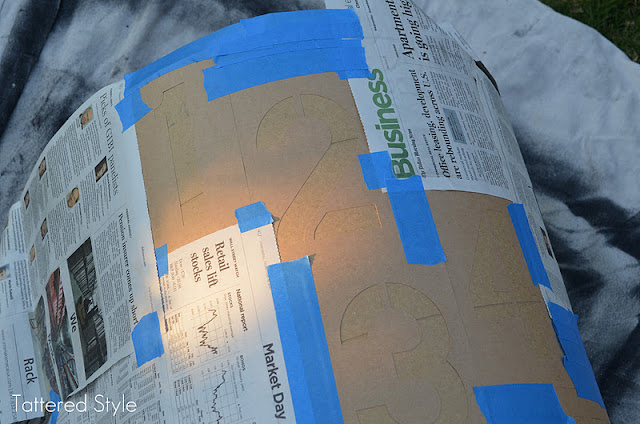
For this project, I positioned the stencils ~ wrapping them around the cylinder so they are seen from one vantage point.  I taped them into place with blue painter's tape.  Next, I put tick marks on the edges of each stencil so I would know where to reposition them after the following step. 


I coated the back of each stencil with several light coats of adhesive spray ~ allowing it to dry so it would be tacky to the touch.


I repositioned the stencils on the tube and taped off areas I wanted to protect from overspray.  Then I lightly sprayed each stencil with several coats of black paint.  I allowed it to dry for several minutes and then carefully removed the stencils, tape and newspaper. 


I think at this point, I was pretty excited about the way the table was going to turn out. 


Done ~ that was it.  I topped the cylinder with a piece of glass and placed it next to a chair in my living room.  


The diameter and height of the cardboard was the perfect size for a table.  I think it turned out pretty cool ~ what do you think?  Now I'm off to grocery shop for the Thanksgiving meal ~ I hope you have a Happy Thanksgiving! 

Linking up today: 
Tip Junkie handmade projects

Thursday, November 17, 2011

A Little Letter Experiment


I love letters and numbers ~ I can't help it, I just do!  The other day I was playing around with an adhesive product to see how it would work using cardboard stencils and spray paint on a variety of surfaces.  In doing so, I pulled out a scrap piece of sheetrock I had laying around and stenciled it with the letter "P".  I have such a fondness for ordinary, unpretentious materials like plain old drywall.  The combination of the silvery "P" on the sheetrock was so pleasing to me ~ I decided to keep it and use it on the buffet in my breakfast nook. 


To begin my accidental experiment ~ I used 6" stencils I had previously purchased from the local Ace hardware store. 


The product I was experimenting with was the stencil adhesive spray (shown above) from Michael's.  I love this product!  The adhesive forms a nice seal for the stencil when using it with various types of paint and prevents the paint from seeping under the stencil.      


I began with a piece of sheetrock and a stencil.  I gave the back of the stencil several light coats of spray adhesive and allowed it to become tacky to the touch.  Then I positioned it on the piece of sheetrock. 


I taped off the part I didn't want painted (with blue painter's tape) so there wouldn't be any overspray to the rest of the area, then sprayed the stenciled area with several light coats of silver spray paint.


The spray adhesive I applied to the back of the stencil prevented the paint from seeping under the stencil and created nice, clean lines. 


I didn't intend on using the "P" as a design element, but I love the way it turned out and propped it up on an easel I already had.  


I liked the simple combination of something so ordinary as a piece of sheetrock and the stenciled letter that I decided it was only fitting to give it a place of honor.  :)  I'm in high gear, as I'm sure you most of you are, in preparing for Thanksgiving next week.  I'm so thankful all the boys will be home!  I hope to be seeing you here again soon.  Please check out Tattered Style on Facebook and Pinterest.

Monday, November 14, 2011

Accessorizing ~ Tattered Style


While we're recovering from a bout of the krud around here (cold/flu season has arrived!) how about boot scootin your way through this post today to see a couple of really simple ways to add a little tattered style to your space?  Shown here, well loved and worn vintage boots line a baseboard and become an interesting part of the decor.   

 
The four best reasons to buy vintage boots?  1).  They're already broken in.  2).  They cost a fraction of what you would pay for them new in a retail store.  3).  They provide instant art and are a unique and surprising accessory when stylizing a space.  4).  They free up much needed closet space!  :)

 
Another idea ~ collected heart shaped rocks (a freebie) act as instant, textural "artifacts" ~ these were picked up on various riverbeds over the years while on vacation.  They bring back fond memories of times together with family and friends. 

 
Propped against the iron arrow, found here for $9, the "hearts of stone" bring a touch of warmth to my guest room. 


Vintage wood hangers also act as an interesting accent to this earthy vignette.  And ~ one of their main attractions was the thrifted price of less than a dollar each.  I love the mix of iron, wood and stone that these simple elements bring to this space.  Thanks for stopping by to check out a few tattered style accessorizing ideas.  Hope you two step your way back by here again soon!  :)

Thursday, November 10, 2011

Framed Recipes / DIY Tutorial


In the last few days, I've received a number of inquiries asking how I put together and hung my mother-in-law's (Nana) treasured recipes.  Here, they hang in my breakfast nook as wall art.  So today, I thought I would give a quick tutorial of how I assembled and displayed them. 

Below is a list of supplies used for the project:


  • 3 ~ Treasured Recipes from Nana
  • 3 ~ 11" x 14" Ready Made Frames
  • Saw Tooth Picture Hangers (included with frame)
  • 3 ~ 11" x 14' Mat Boards (not ones with the centers cut out ~ see below)
  • Archival, Double-Sided, Removable Tape
  • 6 Yards Ribbon 
  • Hot Glue Gun/Glue Sticks
  • Scissors
  • Measuring Tape
  • Pencil
  • Hammer
  • Small Nails

To begin with, I determined what size frames to use for the recipes.  In my case, I used 11" x 14" frames.  I also bought a large mat board and had three 11" x 14" mats cut from it.  I did not buy pre-cut mats, I wanted solid mats (not ones with a cut-out) to provide a background for the recipes.


I disassembled the frames and cleaned the glass.  I then took the mat board and a recipe, and positioned and marked where I wanted each recipe placed on the board.  To preserve the integrity of the recipes, I used archival, double-sided, removable tape to affix the recipe to the mat.  I put a 2" strip of tape on the back of each recipe (at the top only) and gently laid it  on the mat.  When I was happy with the way it was positioned, I pressed the two together. 

I then reassembled each frame and attached the saw tooth picture hanger on the back of the frames (the hangers were provided with the frames).


To attach the ribbons, I first decided how long I wanted the ribbons to be.  In my case, I cut 2 ~ 36" strips of ribbon for each frame.  Next, I hot glued one end of each ribbon to the top corners of the frame.  I tied the two ribbons together to form a bow.


I determined where I wanted each recipe to hang on the wall and then hung them using the saw tooth picture hanger.  I did not hang them from the ribbon.


I then pulled the tied ribbon taut and tapped in a nail to hold it in place.  It appears the framed recipe is suspended from the ribbon, when actually it is hanging from the saw tooth hanger. 

I do love the way the recipes turned out ~ they are a daily reminder of our sweet Nana and her passion for cooking (especially the recipe for "Halbrooks Hash" a.k.a "goulash.").  You family members  know exactly what I'm talking about.  I do hope these instructions are helpful.  Happy Friday to you ~ I hope you are enjoying this wonderful fall weather.  Be sure to check out my favorite Pinterests here.

Monday, November 7, 2011

Springs Have Sprung


I don't usually go all out for holiday decor.  Instead, I like to add a few simple touches to create a little seasonal ambiance.  This Thanksgiving, I decided to use some old bed springs, to convey a sentiment of thankfulness. 


I started out with some salvaged bed springs that were taken from an old bed frame ~ I found it on a trash heap at a house my friend was demoing.  All I had to do was cut the springs off of the bed frame with some tin snips.  Here they are after they've been removed ~ I also love the way they look, casually tossed in a bowl. 


 For this easy project, in addition to the bed springs, all you need are:  
  • Paper Key Tags
  • Rubber Stamps
  • Ink Pad (color of your choice)

I found it much easier to stamp the letters on the key tag, if you remove the metal jump ring first, then reattach the ring to the tag once you are finished.


    After this step, all you have to do is "thread" the tag onto the coil of the bed spring and, "Voila!"~ you are finished.


    ~ A quick way to create a little holiday decor or add a word of sentiment to any event or setting ~


    I love these funky, old, rusty bed springs and the way they add a touch of "Thanksgiving" to this vignette in the dining room.  Be watching for more holiday tips and tricks throughout November and December.  Hoping you have a great week!

    Linking up today:  

    Tip Junkie handmade projects

    Friday, November 4, 2011

    "No Assembly Required" ~ Wine Glass Holder


    I love repurposing items ~ especially when there's "No Assembly Required."  Recently, I posted an idea reusing an old rake head as a wine glass holder.  Read more about it here.  To my delight and surprise, the feedback has been overwhelming.  I think the interest, in part, stems from the fact it was repurposed from something quite common and ordinary.  The rake idea requires little effort to transform it from it's original identity.  


    Funny how you can see an item over and over again and one day look at it in a completely different light.  Such was the case with this vintage "Standard" rubber stamp holder (say that real fast ten times).  I lucked upon it during my recent trip to Round Top for a mere $10.


    I've had my eye on one of these for a long time, likely because I remember my dad having one on the desk in his office when I was a little girl.  I always admired it ~ it reminded me of a mini whimsical carousel.  I would play with it and pretend the stamps were little horses, gracefully taking their riders for a spin.  Practically, I had been looking for one because I had several stamps that I wanted to display.  


    I wasn't needing another wine glass holder, but just last evening, I glanced at this simple utilitarian object and saw it as one.  The best part about it is there's "No Assembly Required!" 


    All I had to do was plop in the stemware.  I'm in love with this idea!  I hope you find it as charming as I do.  :)


    The stamp holders aren't quite as common an item as the rakes, however, they can still be spotted lurking around antique stores and flea markets and are also easily found on Ebay and Etsy.

    Hoping today is a happy fall Friday for you!

    P.S.  Thank you to the wonderful ladies from the Coppell Alumnae Panhellinic Association.  I enjoyed being with you last night and enjoyed sharing about design, holiday inspiration and Tattered Style.  Thanks for bearing with me and my nervous jitters.  It looks like we may be planning a girl's trip to Canton soon.  Can't wait!!!
    Related Posts Plugin for WordPress, Blogger...