Monday, October 31, 2011

Map Quest


Maps intrigue me ~ they remind me of all the wonderful places I've been and leave me longing for the opportunity to visit new places I've never been before.  Probably my favorite piece of "art" in my home is the vintage map that hangs in the sitting room.  The worn patina is like none I've ever seen before.  It's even been mended with some glossy tape that has yellowed over the years and is perfectly ~ imperfect. 

The quest for this wonderful old map took me to Canton (it was a simple install ~ I used common "L" brackets to mount it to the wall).  


I hung an old desk lamp over the map to stand in as a "map light."  Read more about it here.


It's hard to believe in a day when SMART Boards are the norm in most classrooms that pull down maps were once a standard piece of equipment in schools.  This map dates back to 1953.


In the neutral space, this vintage map adds just the right amount of color and creates a great focal point for the room.  I often plop down here and study the map on the wall and dream about traveling the world.  Where's a place you've never been before that you would like to travel to?  Hoping today is filled with good things for you and yours!

Friday, October 28, 2011

Beauty in the Ordinary


In support of the all American pastime, today's post is going to be a little shorter than usual.  I'm actually writing this post on Thursday and will soon be positioned comfortably on my sofa catching game #6 of the World Series.  I'm crossing my fingers and hoping the Texas Rangers can pull off their first ever Series win.  In lieu of a typical post, I'm happy to share some pretty fab photos my friend, Amanda, shot one day at my house.  The photos are of ordinary things ~ but I find such beauty in each of them.  I particularly love this shot of the vintage numbered laundry pins (above).


I also love this angle on the retro stapler ~ I'm quite fond of it as it belonged to my father-in-law, Papa.  It sat on his office desk for as long as I can remember.


I've displayed the vintage skates (thanks Rach), on a shelf I made from an old floorboard ~ I love this photo!  I truly do believe you can find beauty in ordinary things you come across on a daily basis.  Thank you for indulging me, as I take in the game.  See you back here next week.  In the meantime, please check out Amanda's Facebook page here, my Facebook page here, and my pins on Pinterest here.

Tuesday, October 25, 2011

Thrifted Table//Fall Inspiration


I just have to pinch myself when I see treasures like the table above.  I feel my heart start to race as I look around to see if anyone else is eyeing the prize that sits only inches in front of me.  Luckily, in the case of this find ~ no one was. 


I snagged this HEAVY old iron table for $16.00 ~ and it's sitting on my back patio.  I pulled up a couple of chairs and topped them with some linen pillows for extra comfort.  And then...


...With fall finally arriving to Texas (kind of), I can't think of a better way to complete this spot, and usher in autumn, than by adding some easy fall touches to this setting.


Simple things make up the fall vignette:  A white pumpkin, an Antique hydrangea, a recycled gallon jug, an ironstone platter and white candles.


Thrifting is one of those things that continues to surprise me.  It's not that I go that often, but invariably when I do, I luck into something wonderful like this table.  I have high hopes that this thrifted find will include a cup of coffee or tea and some long, lingering conversations with family and friends.  I'd love to hear about your favorite thrifted find ~ Happy Tuesday! 

*  I would be thrilled for you to "Like" Tattered Style on Facebook and/or "Follow" my boards on Pinterest.

Thursday, October 20, 2011

DIY ~ Dr. Pepper Crate Table


Beautiful weather in Texas and I've been feeling the urge to tackle another DIYer.  This time using some old Dr. Pepper crates I had laying around.  I've used them before as low shelving in my son's room when he was younger ~ but he kind of outgrew that idea.  Still a lover of Dr. Pepper ~ they needed to be put to some sort of use.  


This project required five crates ~ I found these a number years ago at a flea market ~ 5 For $20.


First, I stacked them on top of each other.  The top two were a wee bit smaller than the bottom ones ~  but no worries ~ this project is very forgiving.  


Secondly, I racked my brain to come up with a way to connect them all together.  I perused the aisles of the local hardware store until I found ~ duct hanger strap ~ it's used for hanging ductwork in attics.  It's very inexpensive ~ plus ~ it reminded me of the original metal on the crates that was used for reinforcement.   I measured the height of the crates, when they were stacked atop each other, to determine how long to cut the hanger strapping.  I cut four strips (two for each end) with tin snips. 


Next, I held the strapping in place and marked a couple of spots on each crate with a Sharpie.  I then pre-drilled the holes to prevent the wood from splitting.  Following, I screwed the strapping into place with small wood screws (shown above).  By attaching the crates together with the strap and screws (10 per strap), the crate base is quite stable.


Creating the table top was my next step for this DIY.  I used some scrap lumber I've been saving for a project like this.

  
I measured and cut the boards so that there would be a 1" overhang on all four sides.  *Ya think it's a little weird that I love the smell of freshly cut wood?


I sanded the boards with a sanding sponge, to prevent splinters, and then ran a thin bead of wood glue between each board. 
 

I clamped the boards together and allowed them to dry overnight.  Finally, I attached the top to the base by predrilling a hole in each of the four corners and screwed the two together using wood screws.


I think the salvaged wood top compliments the weathered Dr. Pepper crates perfectly!  What do you think?  I sealed the wood, using a matte finish sealer and to complete the project ~ I screwed four rubber bumpers on the bottom of the crate at each corner to protect the flooring.
 
And here's the finished project!  I snipped a few branches from a bush in the backyard ~ luckily the foliage matches the crates to a tee.  I'm loving this crate table and think it turned out pretty spectacular!


That's all for this DIY project ~ I hope you have a wonderful weekend!  Also, thanks to my carpentry tutor ~ Frani ~ for all of  your helpful tips!

Tuesday, October 18, 2011

House Tour ~ Breakfast Nook


I thought I might share a few pics of the breakfast nook today.  My favorite French cafe chairs surround the table.  It's nice that this pretty scene greets me each morning since, I'm sorry to say, I am not a morning person.  It kind of helps ease me into the day.
 

It's a simple spot ~ but so comfy and inviting.  The light comes pouring in during the day.  The farm style table is a flea market find. 

The handwritten recipes, worn with age, were given to me by Nana and are a real treasure.  I framed them up in simple black frames and attached ribbon to them to add a little more presence.  Read more about this project here.


When we first moved here all of the cabinets were stained ~ but over time the stain had yellowed badly.  They really dated the house, so I decided instead of going with typical white cabinets, to do something a little different and paint them black.  The built-in originally had glass covered doors on it, but during the paint process we took them down.  I liked the open shelving so much, I opted to leave the doors off which makes for easier access to the dishes.


*Note ~ always keep your eyes peeled for others castoffs on garbage day.  The floor lamp was a freebie ~ found curbside on trash day.  A couple of coats of spray paint covered over the dingy brass lamp and now here it rests in the nook's corner.  The stool at the end of the cabinet - was something my neighbor, Pam, no longer wanted and I was happy to find.  The vintage rug is courtesy of my friend Barb :) ~ something she chose to part with when she moved to her current home.  Thanks to my friend, Amanda, for all the great photos.  See more of Amanda's beautiful photography here.  And thank you for stopping by ~ I hope your week is filled with good things.  

Friday, October 14, 2011

Yellow + Black + Metal


A favorite vignette of mine is pictured above.  It includes random treasured finds which are unified by color and texture.  I'm choosing to use the large "&" sign as the number "3" instead ~ meaningful to me because of my three sons.  An aged chicken feeder stands ~ propped on its end. 


The weathered Texas license plate is elevated to new heights atop this vintage store price display stand.  I think this is the easiest "project" I've ever done.  Luckily, the tag and the stand had the same dimensions.  So all I had to do was wire the tag to the opening of the stand.  How's that for the world's easiest DIY project?


 I consider the Remington Portable a work of art in itself.


Don't you think the typewriter keys are exquisite?  I also have a treasured necklace made from an old typewriter key ~ but I don't think I could ever bring myself to dismantle this tired old machine.  If you would like, you can read more about the metal 2 and 6 here.


As with most things, I acquired these pieces over time.  It's always fun to see how they will all eventually come together.  I think this grouping of industrial items works ~ they are all tied by color and texture. Yellow + Black + Metal = that's all for today!  I would love to hear about a favorite vignette in your home ~ have a wonderful weekend!

Tuesday, October 11, 2011

DIY ~ Hanging Candle Holders

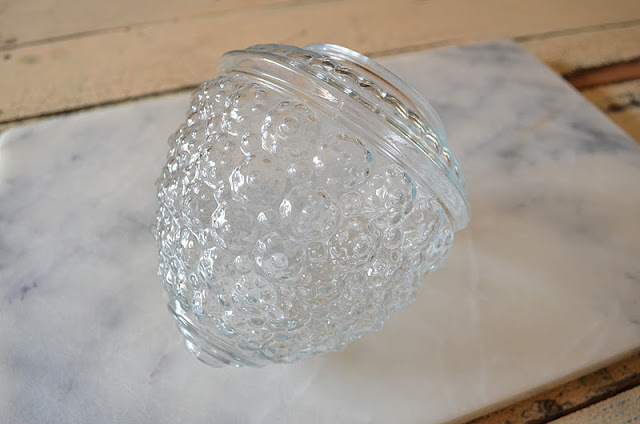
Here's a simple project anyone can do.  I was inspired to get creative with several old discarded ceiling fixture globes.  These inexpensive globes are often used by builders for ceiling fixtures in bathrooms and in hallways.  I thought the pressed glass was just too pretty to let go of.  I decided to repurpose them as hanging candle holders.  Here's what you will need for this easy DIY project.


~ Globes from an old light fixture ~ 

If you don't have any old ones laying around, they can easily be found at thrift stores for about a dollar.


Wire
Wire Cutters
Needle Nose Pliers


First, I determined how long I wanted the finished length of the hanging holder to be.  I used wire cutters to cut a length of 16 gauge wire for each globe plus an additional 6 - 8 inches to allow for twisting on the ends.  I used varying lengths of wire for each globe so they would differ in height.  I bent the wire at the midpoint of the long piece of wire and formed a loop (see above) this will be what the holder hangs from.  


Next, using needle nose pliers, I twisted another piece of wire around the neck of the globe (globe wire).  I slipped the hanging wire onto the globe wire (see above) and twisted the ends of all the wires until snug.  And that's it ~ you are finished!     


I chose to hang the globes from a vintage I.V. pole that I already owned.  I placed tea lights inside of each globe ~ and when they are lit they create the prettiest flickering patterns on the wall in the evening.


Here they are hanging in the corner of my sitting room.  These hanging candle holders could also be hung from hooks or on a nail ~ depending on where and how you would like to use them.  I also think they would make a charming exterior light treatment for an outdoor party ~ wouldn't they be festive hanging from tree branches?  Additionally, this could be used as a clever idea for an outdoor wedding feature.  Happy Tuesday ~ I hope you have a terrific week. 

Friday, October 7, 2011

Flea Market Favorites


On my recent trip to Round Top, one of my favorite days was at Marburger Farm.  There were several dealers who really grabbed my attention.  The first was Becki and Jur van der Oord, of Installations Antiques, they have incredible style and taste. I truly wish I could have made it back with their great "House" sign.


They also carried these unique pendant lights ~ I think they would be a standout fixture whether used singly or in a cluster.  And notice the round, red shutter ~ it would be a solid design statement in any room.


Secondly, I thought Utopia Antiques carried some very impressive pieces.  This cow is one of them and reminds me of our favorite car game, "Hey Cow," (thanks Sydney).  I do think this concrete variety would make for a clever install ~ inside or out.


I have a fascination for orbs ~ especially ones of this size and scale.  I'm pretty sure in its former life, this one was an old wrecking ball ~ whatever the case ~ wouldn't it be great in a garden? 


The giant star was another favorite of mine ~ also carried by Utopia.  I would love to have it hanging on a living room wall ~ but really it would serve as instant art most anywhere.  


And lastly, I had to snap of photo of this orange chest ~ the chippy patina was perfection.  I found it here.  I think it would make a great bedside or end table.  It would also provide great storage in a bathroom ~ a handy spot for rolled up towels.  I'm pretty crazy about the oversized glass container holding the dried hydrangeas.  This too ~ is one of those accessories that could easily move all over the house.

Thanks for letting me share some favorite finds from Marburger Farm.  I hope you enjoy your weekend.  :) 

Monday, October 3, 2011

Cool Stool


I've been holding out for just the right stool to snug up to this counter in my kitchen.  It's a relatively small space ~ plus the back door opens onto it.  I'm happy to have finally found it.
 

I've had this stool pulled up to the counter for years.  It's served the purpose, but I've never really been in love with it ~ it's one you see everywhere.   


I spotted this vintage metal stool at Round Top last week ~ industrial cool.


~ and it only cost $6.00!


~ The perfect mix of patina + style ~ 


I'm reminded all over again that patience and persistence pays off.  My word of encouragement to you ~ is to hold out and sooner or later you can usually find exactly what you are looking for ~ and for a reasonable price. 
Related Posts Plugin for WordPress, Blogger...