Friday, March 29, 2013

The Midas Touch ~ A Royal DIY


Yea!!!  I finally found a little time to give this demure table a makeover.  It's surprising what a $5.00 can of spray paint and a little TLC can do.  A friend from elementary school had this telephone stand in her home when she was growing up.  This past fall she passed it on to me in hopes that it might be given a second chance.  After living with it for awhile, I established it possessed a regal personality and decided to give it the Midas touch.  It was a very simple project with a magical result!  Read more below to see how it took on a more majestic role.    


It had seen its share of wear and tear over the years.


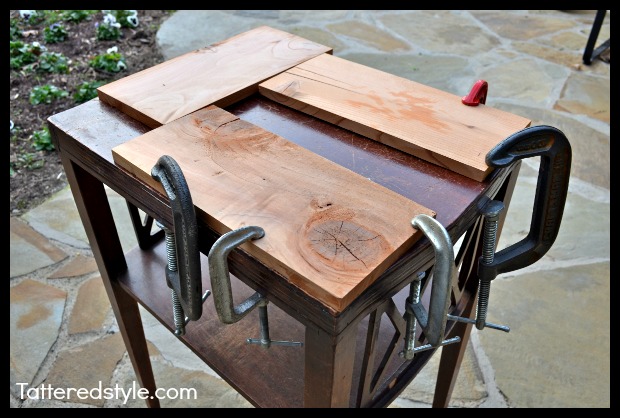
It required a little gluing~ I used Elmer's wood glue ~ and clamping (notice I placed pieces of wood between the table and clamp so the table wouldn't be damaged when I cranked the clamp tight) .


It all so needed to be cleaned up, so I ran over it with an electric sander a few times.  I used 220 grit paper to knock off the lacquer and smooth out the scratches.  And lastly I gave it several light coats of gold spray paint ~ I used Rustoleum Metallic in Gold.


Here she is in all her new found glory ~ I think the Midas touch suits her well (notice how "it" became a "she" ~ it seemed only fitting!).


The black and white framed print (which looks like a castle to me), bumble bee (a symbol of royalty) dish and ceramic glove mold (notice the resemblance of the Queen of England's gloved hand) are all flea market finds.  The marble egg (kinda makes me think of the goose and the golden egg) and vintage charm bracelet (representative of the Crown Jewels) were given to me by Nana.  Don't you think the transformed ugly duckling should feel right at home here?  ;)


*By the way, the lovely book perched on the shelf, is one of my current reads ~ Interiors Atelier AM by Alexandra and Michael Misczynski.  It's filled to the brim with eye candy for the heart and soul.  Find it here.   

**To my dear friend, Dena ~ I hope you are pleased with the outcome of the telephone stand and its transformation honors your mom and dad well.

And to all else, I hope this Easter weekend is meaningful for you and yours.  Happy Easter!!!

Friday, March 22, 2013

Therapy Time


Just playing around today with simple things that make me happy.  After a full week of designing for other people, it's always therapeutic for me to come home and putts in my own space.  I thought it was time to change up my kitchen table so I poked around in my storage closet and grabbed this vintage amber bottle and twisted some jute twine around its neck. 


As luck had it, I recently stumbled across these cool dice at one of my favorite vintage stores in Austin, find it here.  I decided they would be perfect paired with the vintage bottle and tossed them next to it.


I'm using my favorite feed sack as a runner ~ read more about it here.


To finish it off, I plopped a cutting from a curly willow in the bottle with hopes of transplanting it someday.  That's all for today, I'm making a huge effort to take it easy the rest of this weekend.  I hope you get to have some chill time too!

Wednesday, March 13, 2013

Patching a Hole / DIY


Here's a quick tutorial on how to patch a hole in a wall.  I can almost guarantee everyone of us will eventually deal with having to make a repair like this sooner or later.  Just remember, once you commit to using an anchor, nails, screws, etc. ~ the hole/holes they make can always be repaired.


Here's what you will need:
  • Hammer
  • Tissue Paper
  • Vinyl Spackling
  • Primer
  • Paintbrush
  • Paint 
  • Clean Cloth
  • 5 in 1 Tool 

First, pound it! ~ Which means, take a hammer and pound the area around the hole that was made with the anchor ~ so as to smooth out the perimeter of the hole where the anchor was removed. 


Next, crumble up a bit of tissue paper and place in the hole.  This will give the spackling something to grab onto.


Then, put some spackling over the tissue paper and smooth it out with a putty knife or a five-in-one tool (my # 1 go to tool ~ find one here). 


Wipe off excess spackling around the perimeter of the hole you are patching with a wet paper towel or cloth.  I generally use a piece of an old t-shirt. 


Allow the spackling adequate time to dry (or cheat like I do and dry it with a blow dryer).


Then apply a second application of the spackling to build up the area ~ repeating the above steps.  When dry (bring out the blow dryer again) you are ready to prime the area (important step).


Apply a coat of primer and allow to dry (or blow dry).


Then apply your first and second coats of paint.   That's it!  People are typically afraid to make holes in walls (especially if you are renting) for fear of not being able to repair them.  Honestly, no fear here!  I hope this helps!  Please let me know if you have any questions or if this has been helpful to you.  XO ~ Dana

Thursday, March 7, 2013

Water Sprinkler / Paper Towel Holder


Today I'm excited to share how I upcycled an old lawn sprinkler into a paper towel holder.  We all know there are scads of towel holders on the market ~ but I couldn't land on one that I was crazy about.  Then I remembered this vintage iron water sprinkler I had in the shed.  It has character galore and was such a quick fix for what I had been searching for. 


Who knew this vintage lawn sprinkler would one day end up as a kitchen accessory?


I made a few adjustments to it so it could transition from the yard to the kitchen.  I gave it a scrub,  then wiped on a couple of coats of poly (find it here) with a clean cloth.  I actually used a piece of an old t-shirt to apply the sealer then allowed it to dry thoroughly.


The roll of paper towel fits perfectly on the sprinkler.  And it's heavy enough to stay in place when someone needs to tear a sheet of paper off so it won't go toppling over.  I love my new/old paper towel holder!  What do you think ~ fun, weird, cool, yep, nope?  I'd love to know your thoughts! 
Related Posts Plugin for WordPress, Blogger...