Showing posts with label Table. Show all posts

Monday, July 9, 2012

Laundry Cart Makeover / DIY


Hi ~ we're back from our family vacation (it's always nice to take a break from life for a few days!) ~ and I'm excited to share this wonderful old laundry cart project with you.  I found the cart at a flea market ~ in this condition.  All that was left of it, was it's skeleton frame and the casters it came on. 
 

I decided to make a table out of it and headed over to Orr-Reed Wrecking Co. ~ a wonderful salvage yard in Dallas ~  to see what I might come up with for a top.  It's always one of my favorite spots for salvaged materials.  This iconic, architectural salvage hot spot has undergone quite the transformation recently (you gotta see it) and is chock full of wonderful inventory.  If you live in the area, you definitely need to pay them a visit and please be sure and tell them I sent you.  


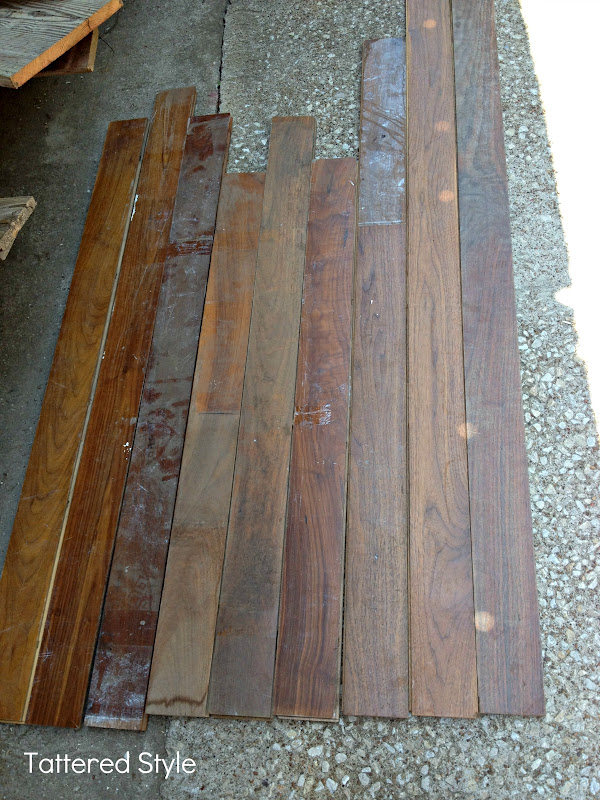
After scavenging at Orr-Reed's for awhile, I decided on some old tongue and groove wood flooring for my project.


Once I got the wood home, I decided to use the backside of the flooring for the topside of my table.  There was no particular reasoning involved ~ I just liked the way it looked and preferred it over a smooth surface. 


After I determined the finished measurement for the tabletop, I cut the boards to the desired length.  Then I interlocked the boards together and secured them to each other by adding a support strip to the back ~ making sure to screw each board to the strip of wood. 


Next, I used electrical strapping and screws to attach the top to the cart base.  


I pre-drilled the holes and screwed the straps to the underside of the tabletop. 


As you can see, I attached two straps to each end of the tabletop and one on each side ~ this secured the top to the base. 


Loving this piece already!!!


Lastly, I sanded the top with a electric sander and then applied a coat of polyurethane to it with a brush. 


If I had a big old loft apartment, I would use the cart as an entry table (sigh...wishful thinking).  Here's how I have it arranged today ~  although I could easily change my mind and move it tomorrow.  :)  I'll be sharing more tattered style goodness soon ~ hoping this week is a good one for you!

Tuesday, December 20, 2011

Preview ~ Vintage Home FINDS for Dallas Market


Most of the time I'm posting about wonderful finds that I've come across.  Not today.  Instead, I'm excited to be sharing with you some *sneak peaks of items I'll be selling at the Dallas Market Center in January.  That's right ~ Dallas Market Center is launching a new temporary venue bringing Vintage Home FINDS directly to the retailer. 

Oftentimes, designers and retailers are in need of one-of-a-kind furnishings, unique pieces of art or interesting objects to be used for display or props in a home/store.  With the addition of Vintage Home FINDS, the DMC will be making the designer/retailer's job a little easier by eliminating the need for going out and finding that "perfect piece" ~ instead we will be bringing it to them.  

Here are just a few industrial/vintage selections that I'll be taking to market: 

*Above...one of my fave's ~ an old New York Times display stand ~ ideal not only for magazine or newspaper storage but also for various goods/merchandise.


*A collection of various pressure gauges ~ wouldn't they be great as wall art or used in displays on a shelf or table?


*The uses for the chunky table on wheels are endless.  It would be a great place to merchandise wares ~ and would be equally appealing as a coffee or end table.   

*The tip top of a weathered railroad jack ~ an exceptional accessory! 


*The old mail receiving station above is brilliant in this vibrant blue color - it would perfect used as a host/hostess station in an eclectic restaurant. 

I'm happy to be part of this exciting event ~ and happy to share some wonderful finds with you as well.  If you are part of the retail trade, I hope you'll be visiting the Dallas Market Center ~ Vintage Home FINDS on January 20 - 23, 2012 (taking place during Dallas Total Home and Gift Market).  I promise it will be well worth the visit ~ the displays themselves will leave you feeling inspired.   

I'm off to finish up some last minute Christmas shopping ~ and just maybe I'll have a little extra time to scour some out of the way places for more great Vintage FINDS!     

Tuesday, November 22, 2011

Cardboard Table ~ Why Not?


Awhile back, I was at a shop waiting for some guys to load a purchase into the back of my truck.  I noticed an empty cardboard tube sitting off to one side.  Curiosity got the best of me, so I asked them what was going to happen to it.  As expected, they were going to throw it out.  So without hesitation, I asked them if I could have it.  "Sure," they said as they let out a little chuckle and loaded it into the back of my truck.

I know for most, this humble piece of cardboard would be headed straight for the recycle bin.  But I just couldn't let it go.  It was strong and durable and I had visions of a side table in my head.  I'm not sure what Penny saw but she seemed quite curious...


She kept hanging around so I had to snap these cute pictures of her. 


I can only imagine what was going through her mind.  Probably something like ~ "Ya know you could be playing fetch with me" ~ and I did ~ some.
 
After awhile she grew bored, but faithfully continued to hang around as I got back to my project. 


On my last post, I experimented with some stencils ~ specifically for use on this table.  I don't want to overdo the use of letters/numbers ~ but I do have a fascination with them.

For this project, I positioned the stencils ~ wrapping them around the cylinder so they are seen from one vantage point.  I taped them into place with blue painter's tape.  Next, I put tick marks on the edges of each stencil so I would know where to reposition them after the following step. 


I coated the back of each stencil with several light coats of adhesive spray ~ allowing it to dry so it would be tacky to the touch.


I repositioned the stencils on the tube and taped off areas I wanted to protect from overspray.  Then I lightly sprayed each stencil with several coats of black paint.  I allowed it to dry for several minutes and then carefully removed the stencils, tape and newspaper. 


I think at this point, I was pretty excited about the way the table was going to turn out. 


Done ~ that was it.  I topped the cylinder with a piece of glass and placed it next to a chair in my living room.  


The diameter and height of the cardboard was the perfect size for a table.  I think it turned out pretty cool ~ what do you think?  Now I'm off to grocery shop for the Thanksgiving meal ~ I hope you have a Happy Thanksgiving! 

Linking up today: 
Tip Junkie handmade projects
Related Posts Plugin for WordPress, Blogger...