Showing posts with label Dr. Pepper. Show all posts

Thursday, October 20, 2011

DIY ~ Dr. Pepper Crate Table


Beautiful weather in Texas and I've been feeling the urge to tackle another DIYer.  This time using some old Dr. Pepper crates I had laying around.  I've used them before as low shelving in my son's room when he was younger ~ but he kind of outgrew that idea.  Still a lover of Dr. Pepper ~ they needed to be put to some sort of use.  


This project required five crates ~ I found these a number years ago at a flea market ~ 5 For $20.


First, I stacked them on top of each other.  The top two were a wee bit smaller than the bottom ones ~  but no worries ~ this project is very forgiving.  


Secondly, I racked my brain to come up with a way to connect them all together.  I perused the aisles of the local hardware store until I found ~ duct hanger strap ~ it's used for hanging ductwork in attics.  It's very inexpensive ~ plus ~ it reminded me of the original metal on the crates that was used for reinforcement.   I measured the height of the crates, when they were stacked atop each other, to determine how long to cut the hanger strapping.  I cut four strips (two for each end) with tin snips. 


Next, I held the strapping in place and marked a couple of spots on each crate with a Sharpie.  I then pre-drilled the holes to prevent the wood from splitting.  Following, I screwed the strapping into place with small wood screws (shown above).  By attaching the crates together with the strap and screws (10 per strap), the crate base is quite stable.


Creating the table top was my next step for this DIY.  I used some scrap lumber I've been saving for a project like this.

  
I measured and cut the boards so that there would be a 1" overhang on all four sides.  *Ya think it's a little weird that I love the smell of freshly cut wood?


I sanded the boards with a sanding sponge, to prevent splinters, and then ran a thin bead of wood glue between each board. 
 

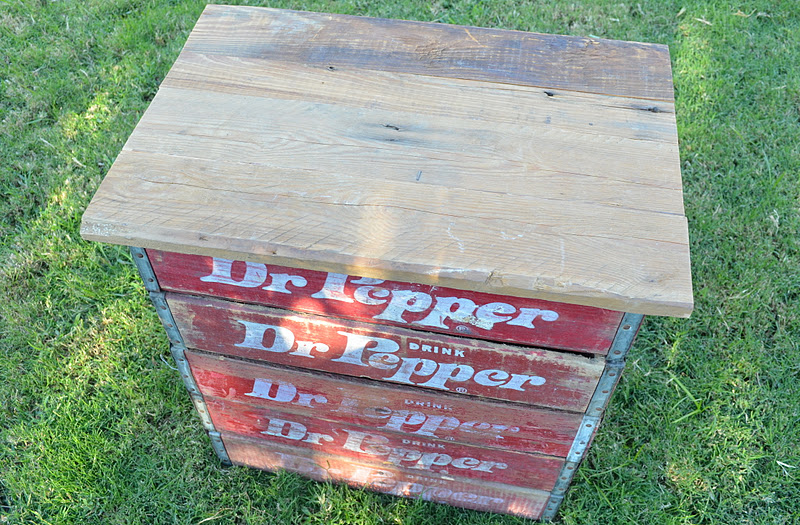
I clamped the boards together and allowed them to dry overnight.  Finally, I attached the top to the base by predrilling a hole in each of the four corners and screwed the two together using wood screws.


I think the salvaged wood top compliments the weathered Dr. Pepper crates perfectly!  What do you think?  I sealed the wood, using a matte finish sealer and to complete the project ~ I screwed four rubber bumpers on the bottom of the crate at each corner to protect the flooring.
 
And here's the finished project!  I snipped a few branches from a bush in the backyard ~ luckily the foliage matches the crates to a tee.  I'm loving this crate table and think it turned out pretty spectacular!


That's all for this DIY project ~ I hope you have a wonderful weekend!  Also, thanks to my carpentry tutor ~ Frani ~ for all of  your helpful tips!

Tuesday, May 17, 2011

Dublin Gate


Today I thought I would share one of my favorite things with you ~ this old gate that has been following us around for years.  The hubby ran across it one day while away on a business trip to, of all places, Dublin, Texas.  Some of you may not know that Dublin is the home of the oldest Dr. Pepper bottler in the world.  This is an important piece of trivia to know, especially if you are a lover of Dr. Pepper like I am.  At this plant, Dr. Pepper is still made with pure cane sugar, unlike the Dr. Pepper you buy in stores ~ and trust me, you CAN taste the difference.  

Back to my story ~ Nat passed by an old junk store on his way to an appointment and saw the gate sitting on the sidewalk outside the store.  He knew I had been searching for a salvaged gate and to my delight, on his way back from the meeting, he stopped in and picked it up as a surprise for me.  To me, there are various details about the gate that make it special and unique.   


~ The scrolly ironwork on the top of the gate ~


~ Its wonderful rusty patina and ornate, curly latch ~

The gate hangs on a wall that has been painted a soothing shade of grey ~ I think the color compliments the iron piece beautifully.  I've adorned the gate with a number of special items ~ they each have a story to tell.


One of the most meaningful collections I own is this grouping of crosses.  Nat made a mission trip to Liberia several years ago and met a gentleman who made these crosses.  They were fashioned from shell casings he had gathered off the ground following the Liberian Civil War.  It struck me as ironic that something meant for death and destruction was turned into something that represents life and hope ~ I cherish these.


I also tucked old black and white photographs on the gate.  This particular photograph is one of Nat's distant relatives ~ I hung it on the gate with old, rusty chain.


More beloved photos ~ one of my mom as a child and one of her with her mom on a shopping trip.


This one is of my dad ~ wasn't he dapper looking?  I love the plaid suit and the bow-tie he was wearing.


For now, the gate hangs in the front room leading to a hallway ~ I pass by it all the time and often stop to gaze upon its sentimental treasures. The items on the gate change periodically ~ whenever the notion strikes me.  I'm sure this gate will remain a favorite of mine for years to come.  What's one of your favorite pieces in your home? 

Related Posts Plugin for WordPress, Blogger...