Friday, September 30, 2011

Rachel Ashwell and The Prairie

~ This is the floor in the foyer of Lilliput Lodge ~
This is the place where you enter into Rachel Ashwell's world and her life on The Prairie ~ the house where she stays, when she is in Texas.  It's lovingly named Lilliput Lodge ~ after her daughter, Lily.  

You know the question that we've all been asked one time or another, "If you could invite five people to dinner, who would they be?"  Well, for me, one of those people would be Rachel Ashwell.  And if you were to have told me years ago, when I was a young mother, that one day I would have a chance to have a chat with Rachel, I would have let out a little chuckle and said "Yeah right."  Monday ~ I had the honor of meeting this remarkable lady ~ at a blogger's luncheon.
~ Rachel pausing to chat during lunch ~

Let me share why I have so much admiration for Rachel ~ mind you the reasons are in no particular order but are merely how they popped in my head on this day.

First, I respect her as a mother.  From reading her books, one can't help but appreciate her unfailing love for her children.  Through the years, she has tenderly shared snippets of Lily and Jake's lives.  I was always impressed by her devotedness to them and moved by her desire to create a beautiful environment they could live in without worry of mussing things up.  Perhaps my deep respect for Rachel as a single mom, stems from the fact that my widowed mother raised four children alone.  

~ Rachel giving a tour of her home on The Prairie ~
Secondly, through her signature Shabby Chic style, she validated my love for tattered things.  She dared to be different and gave me the courage to march to the beat of a different drummer.  She was true to herself and consequently, she has significantly impacted the design world. 
 

And lastly, I appreciate Rachel for her genuine heart ~ she's the real deal.  She is a gentle and gracious hostess and comfortable in her own skin.  She loves blue jeans, t-shirts and cowboy boots and likes them all the more when they're worn and comfy ~ my kind of gal.  She's a lady and speaks softly and sweetly ~ surely she must lose her temper every now and then.  :)

~ A snapshot taken at Shabby Chic Couture on The Prairie ~
I left the ranch that day, feeling rich ~ happy our paths had crossed and so thankful to have met Rachel and her gracious staff ~ they all are truly a special bunch.  Thank you for allowing me to share my thoughts with you.  I hope you have a happy weekend!

Tuesday, September 27, 2011

A Flea For All


I'm still in Round Top for Antiques Week ~ "fleaing" to my heart's content.  Here's a few photos I've snapped so far.  First stop was The Gypsy Wagon and their beautifully revamped Airstream trailer.  Didn't their logo turn out wonderful?  It's quite a show stopper!  I'm sure owners, Carley and Johnny Seale, would love for you to stop by their store the next time you're in the Dallas area.  I promise you won't be disappointed ~ check out their website here.  


The colorful Navajo horse club chair they had for sale was nabbed up for country music sensation, Jewel.  I thought this was an interesting bit of trivia I'd throw in.  :)

Next stop was British Route Sign Designs ~ last year I stumbled upon my favorite purchase from this vendor.  So, I had to stop by and say "hi" and see what cool things DeWayne, the owner, had brought to Round Top this show.  As usual, his space was a highlight on the trip.  I spotted this old shooting target ~ such an unusual and quirky find.  It's making its way back to Dallas with me. 


I'm happy to say this beautiful old oil painting is going to join me at my house. I can't deny that the muted shades of the hydrangeas had me from the get go!  It was such a pleasure to meet Gordon and Lynette Harrison ~ they have two incredible spaces at Bar "W" field.  Gordon's space is loaded with exquisite old oil paintings and one of a kind vintage frames.  And Lynette has the most interesting and unique antiques ~ they are passionate about what they do and have great inventory.  If you're in Round Top, it would be worth your while to pay them a visit. 


My favorite fluffy pillow at Pandora de Balthazar    It was the ultimate in squishiness and style.  Thank you, Toni, for sharing the European Sleep System with me ~ it was heavenly...

Yesterday was an extremely fun-filled day at the Blogger's Luncheon ~ held at The Prairie by Rachel Ashwell.  It was such a wonderful experience.  I'll be sharing all about the day's events with you on Friday.  As for today ~ I'm off to Marburger.  See you soon!

Friday, September 23, 2011

Calligraphy Name Tag Project


A quick, short blog today about a project I've been working on for the last little bit.  I've been crafting name tags for a Blogger's Luncheon I will be helping out with next week at Round Top.  The luncheon will take place at The Prairie, by Rachel Ashwell.  The event will bring together 35 bloggers, most who have never met before.  So, I decided to create a unique personalized tag for each attendee ~ I adapted them from a previous project that I did here.  It begins with the pocket-sized French book pictured above ~ I found it one day while shopping here


The first step was to pull pages from the tiny book ~ it was indeed an unfortunate part of the process.  It felt as if I were committing a crime ~ at least in my mind anyway.  I had a friend of mine (thanks Shannon) hand calligraphy the bloggers names on the torn pages from the book.  Shannon was recently inspired to learn the art of calligraphy specifically for the reason of hand addressing all of his daughter's wedding invitations.  A pretty special gift to his girl, Madison, if I may say so myself.


After the pages were penned, I laminated each of them.  


Then I punched holes in the top so I could loop a ribbon through to serve as a lanyard.  


Lastly, I strung ribbon through the holes and knotted the ends.  The "ribbon" is actually vintage hem tape I bought from a vendor at Brimfield.  Below, the name tags hang from a vintage I.V. pole I landed while fleaing one day.  I think the tag would also serve well as a luggage tag or would be quite beautiful hanging on a chair ~ as a place marker at a dinner party.
  
Just hangin' out ~ Round Top or bust!
I'm anticipating a great trip filled with good things.  Thanks to Bud, "The Pieman" from Royers Round Top Cafe, in advance for the wonderful grub we'll be partaking of at the blogger's luncheon on Monday.  Also, thanks to my friend, Kelley, of The Hidden List, for coordinating the event.  A portion of the proceeds will benefit Dwell With Dignity.  Shopping at Rachel's new store, Shabby Chic Couture is sure to be one of the highlights of the trip.  I'll be sharing photos and some of my experiences here as well as on Facebook and Twitter.  Have a good weekend.  :)

Tuesday, September 20, 2011

Round Top Reward


Last spring I made a trip to Round Top for a flea market excursion with some friends.  Besides getting away to have some much needed girl time, I was also on a quest for a few specific items.  I was particularly interested in finding an iron twin bed frame ~ one to fill a corner of a spare room.  The room also doubles as my home office ~ also known as myspace.  I ended up acquiring the iron bed, pictured above. for a reasonable price of only $40.00.  I cleaned the bed up and deliberated over how to incorporate it into its new surroundings.  Typically, I would never paint over perfectly good rust, but I ended up changing my mind this time around.   


I eventually had the bed sandblasted and then powder coated it a bright white. I'm sure there are plenty who would question why I painted over the rust.  It certainly wasn't something I took lightly and I gave a lot of thought to it.  But ultimately, I determined the dark bed frame ate up too much space visually ~ and quite simply the small room demanded a bed frame that would fade into its surroundings. 


It really turned out beautiful ~ I wish my photos gave it the justice it deserves.  Oh ~ and I do love the box pleated bedskirt with its covered buttons ~ it's definitely a keeper.  I found it here


I've also been considering options for the rest of the bed coverings.  For now, I've tossed an inexpensive white quilt on the bed and draped it with a ruffley tablecloth I found on sale here.  Recently, my friend Kelley, of The Hidden List, has been featuring a series on how to "Build a Better Bed" on her blog.  I've been so inspired ~ I hope to make this guest spot as luxurious and inviting as the beds I have read about.  Check them out here.

Shortly after finding the bed, I also ran across the rusty medical cabinet that is standing in as a nightstand.  My original plan was to leave its finish untouched too, but after I have lived with it for awhile...


 ...my choice is to paint it a crisp, fresh white to match the bed.  I'll complete its makeover and accessorize it with clear glass knobs.  Be watching for "Before" and "After" photos.

And speaking of Round Top ~ I have more to share about the upcoming Antiques Week and some pretty exciting happenings.  I'll be back on Friday to fill you in on it, so be looking for my next post.  Until then, you might want to check out Tattered Style on Facebook where I'll be posting "Thrifted Finds of the Week."

P.S.  Thanks to the following blogs for recently featuring Tattered Style:  Handmade in TX, Etsy Fort Worth ~ "Organizing With Vintage Finds" and Etsy Fort Worth ~ "A Rake By Any Other Name."

Friday, September 16, 2011

Restoration Hardware Rope Tiebacks / DIY


Ever since I first laid eyes on the incredible rope tiebacks at Restoration Hardware (see below) ~ I've been longing to have them as tiebacks for the drapes in my bedroom.  I've been holding off from buying them just because I didn't want to plunk down the cash for them.  I finally decided I could probably come up with something similar if I just put my mind to it.  Here's what inspired me:


 Find it here:


The grounding piece for the whole project was some heavy rope.  I found it here.  I cut a length of rope into 2 ~  23" sections.
 

The tricky part was pulling together other items to mimic the hook on the tieback and the ring for the wall.  I was able to improvise by using the following objects:  2 hitching post rings, 4 j-bolts, 4 ~ 3/4" copper caps, 2 ~ 3/4" couplings, 8 nuts and 8 wood screws.  I found all of these items here.

A friend of mine, Frani, generously helped me with the next part of the project.  It required:  1. Cutting the two couplings in half.  2. Drilling a hole (the size of the diameter of the j-bolt) in the end of the copper caps.  3. Inserting the j-bolt into the caps and securing them in place with nuts on each end.  4. Frani cut a smaller piece of copper tubing, the length of the cap and coupling (he did this so the cap and coupling would have something to sit on to hold the two together.  


5. Apply Gorilla Glue inside the cap of the copper tube and insert an end of the rope.  *Important ~ per Frani's suggestion, I taped off where the rope was inserted into the coupling with some blue painter's tape (see 2 photos below) to keep the glue from oozing out and drying onto the rope.  If you've ever worked with Gorilla Glue, you know it expands as it dries and it's killer removing the dried glue.  Allow the glue time to dry overnight.  This may sound like a lot of work, but it really went pretty fast.  I think we completed this part under an hour. 
 
The next day after the glue had dried ~ I roughed up all the metal surfaces so the paint would adhere to the metal.  I used 100 grit sandpaper ~ course enough to scuff up the surface, but not too course that it would mar the surface.

  
The finished length of each tieback is 26" ` from end to end.


The final step was to spray paint the hooks and hitching post rings.  With the blue tape still in place, I laid newspaper over the rest of the rope so it wouldn't get any over spray.  Then I sprayed several light coats of black satin paint onto the hardware.  I opted to spray paint the hardware for my tiebacks with a black satin spray paint because the curtain rods I have in my room are black. The ones from R.H. are in a bronze finish.


Finally, I'm a little impatient and wanted to speed the drying process up a bit, so I put the hardware in a warm oven (200 degrees) and allowed it to "bake" for about 10 minutes. 


Here's the final product after I attached the hitching post ring to the wall.  I'm pretty excited with the results.

The project took a little time (about 2 1/2 hours) but, in the end, the tiebacks were significantly cheaper than the ones from "you know where" (I really don't want to diss them because they're one of my fave stores!).  And, there's something to be said for doing it yourself that's pretty gratifying.  

I hope I've made the directions clear ~ if I haven't, leave a comment or shoot me an email and I'll be happy to answer any questions for you.  It would make me so happy if you would "Like" Tattered Style's page on Facebook ~ click here to do so.  You can also follow my Pinterests here.  I hope you have a wonderful weekend. 

Tuesday, September 13, 2011

House Tour ~ Living Room


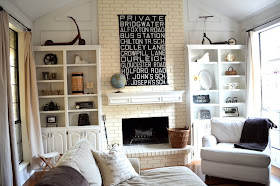
After sharing photos of the dining room the other day, I thought I might as well go ahead and make it through some of the other rooms in the house.  This space is where all the room flip-flopping began.  Originally the formal living space (meaning rarely did anyone step foot in here), this room is now the main gathering space in our home.  Although it's not grand in size, its soaring ceilings give it such a grand feeling to me.  I attribute it to all the wonderful light that comes pouring through the windows.  


This wasn't always the case for this room.  When we moved into this house eleven years ago, it was dark, dated and a little depressing.  The stained paneling had yellowed badly over time ~ and the dark fireplace was just plain creepy.  I vacillated back and forth for awhile ~ "to paint or not to paint?"  I'm sure the room was quite beautiful in its heyday ~ but time had taken its toll.  Against numerous people's opinions, I finally decided to proceed forward.  I did the unpardonable and whitewashed everything!  And ya know what?  I've never looked back ~ painting that dark and dingy room was like a breath of fresh air.


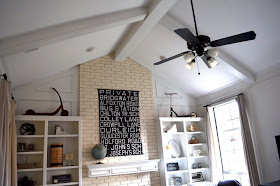
You might wonder why I opted to share this pic of the ceiling.  Well, if you've ever spent hours on end scraping popcorn off ceilings, I bet you have great appreciation for this nice, smooth one.  Scraping was an arduous task and undertaking but the benefits far outweigh the pains of taking it down.  And just for clarification, I think cottage cheese and popcorn are nice to eat ~ I just don't like them on my ceilings. :)  If you like, read more about the vintage bus roll sign that hangs above the mantle here

After all the priming and painting (thanks to the hubby who is a meticulous painter) and sanding and scraping ~ the room was finally given a new lease on life.  Oh, and I'm crazy about the old cafeteria cart turned TV stand ~ read more about its transformation here


I think this space went from drab to fab ~ from rarely being occupied to a prime piece of real estate  we gather in it most everyday. 


Besides a great place for TV watching, the room also provides an opportune place for chatting, reading or one of my faves (on golf watching days) snoozing.


I love that no matter where you decide to plop down, there's a comfy spot waiting for you.  Read more about the revamped floor lamp here.


Just a thought, if you've been toying with the idea of painting that wood paneling in your home for awhile ~ I would encourage you to go ahead and take the plunge ~ I'm so glad we did. :)


Prior to lightening and brightening this room ~ and before we rethought the purpose of the space, this room went virtually unused.  Once again, I think it's completely okay to flip-flop rooms in your house and just maybe some of that rethinking will give you space you never knew you had before. :)  I hope your day is filled with good things.  XO

Friday, September 9, 2011

Best Banana Bread Ever ~ I Promise!

 
I had two options yesterday afternoon:  1. Crank out a design blog for today or 2. Give int to my son's request and bake him some banana bread.  I've never shared a recipe on this blog before, but decided, "Why not?"  A common downfall for many banana bread recipes is they tend to be dry.  I've tasted lots of banana bread in my life and none surpass this one ~ it's the moistest and tastiest you will ever hang your lip over.  If you don't agree, I'll be shhhawked!  Seriously, I hope you give it a try ~ it's so yummy!


Combine together:  1/2 cup softened butter, 1 1/2 cups sugar and 2 eggs.  


Using my handy-dandy KitchenAid mixer, I whipped it all together until it reached a nice creamy consistency.
 

Side note:  This is the one appliance in life I would rather not live without.  Find it here.


Next, combine the following dry ingredients:  1 1/2 cups all purpose flour, 1 teaspoon baking soda and 1/2 teaspoon salt.  


I then dump it into the mixer along with the first three ingredients and mix well.  


Next, combine:  4 tablespoons milk, 1 tablespoon vinegar and 1 teaspoon vanilla.  


Pour that into the mixer with the other ingredients and blend together.


Finally, add 1 cup mashed (well ripened) bananas and 1 cup chopped nuts.  I put the nuts in my mini Black & Decker chopper (find it here) and chop them pretty fine.


Mix in with the other ingredients.  


Evenly distribute the batter into two greased loaf pans and bake in a 350 degree oven for approximately 45 minutes.


Check for doneness by inserting a toothpick in the center ~ when the toothpick comes out clean ~ you're good to go.  Hold onto your socks ~ you're about to taste the best banana bread EVER!!!


After the smell has been wafting through the house for almost an hour, I usually cut slices right out of the pan and serve it up immediately.  It's not unusual for a loaf to be wiped out in one sitting.  If there is any leftover, you can remove the loaf from the pan by running a butter knife around the edge between the bread and the pan.  Then turn it out onto a plate, let cool and wrap if up for later ~ it won't last long. I would love to lay claim to this scrumptious recipe but I can't ~ Caron, a friend of mine, shared this with me years ago.  I hope you enjoy it as much as we do!

You might be interested to know my son, Gavin, was happy with my choice to make him some banana bread ~ design posting will resume here next time around. :)

P.S.  Here's the complete recipe:

Best Banana Bread Ever ~ I Promise

1/2 cup Butter ~ room temperature
1 1/2 cup Sugar
2 Eggs
1 1/2 cups All-purpose Flour
1 teaspoon Baking Soda
1/2 teaspoon Salt
4 tablespoons Milk
1 tablespoon Vinegar
1 teaspoon Vanilla
1 cup Mashed, Ripened Bananas (about 2 Bananas)
1 cup Chopped Nuts (optional) ~ I use walnuts but you can also use pecans.

Preheat oven to 350 degrees.  Meanwhile, mix together the butter, sugar and eggs.  Add in the flour, baking soda and salt and mix well.  Next stir in the milk, vinegar and vanilla.  Mash bananas in a separate bowl with a fork and add to the previous mixture along with the chopped nuts.  Evenly distribute the batter and pour into two greased loaf pans and bake for approximately 45 minutes and/or check for doneness by inserting a toothpick into the center of the loaf ~ when it comes out clean the bread is done.